Analytics on Shopify
I’ve just been doing some work on Shopify and with the documentation lacking in some areas, I thought that I’d post something showing how it all works and how you can get it set up for you. Many apologies to all the people whose sites I have used to help me over the last couple of weeks who I haven’t referenced here (there were a lot of you and a lot of ‘oh I get it now’ moments, resulting in me changing the set up repeatedly).
For those who don’t know, Shopify is a web shopping system that has a payment gateway of its own so that you don’t have to deal with all that faff (for want of a better description). It allows you to put buy buttons on your site, sell through Facebook and have a shop front of your own that you can use to sell products (or services).
As with any web service (particularly one with money associated with it) you’ll want to know how well it is working and installing analytics is the start of that. However, it isn’t that simple and there are a number of circumstances that we should highlight. You might also want to put third party marketing tags on the pages, which is also slightly more complicated than it could be. I am going to show you how to do this through Google Tag Manager.

In a simple stand alone version of Shopify you are building a shop which is intended to be completely stand alone. In this scenario your shop is its own entity not connected to any other website.
Google Analytics
For this situation the set up in Google Analytics is simple. In the settings within Shopify, there is an online store page. Within this, you can add in your Google Analytics account ID and choose to enable enhanced ecommerce (if you so wish). What this does is put Google Analytics on not just your shop pages (whether you have your own custom domain or not), but it also puts them on the checkout pages, so you can get more details about how your users interact. It does it through Universal Analytics.
This is very useful because it saves you a whole lot of bother. When a user moves from your pages of the shop and checks out, they move on to the shopify payment pages and this represents a ‘break’ in the journey, potentially on a new domain. Shopify have automatically enabled cross domain tracking and they have tagged the checkout pages with your analytics code.
Just a side note early on here about cross-domain tracking: There is code that is enabled on the checkout button that will make it so that when a user clicks on the link, they pass through to a page on checkout.shopify.com with a query string relating to their userID. This means that when Google Analytics drops a new cookie, with a new userID on the checkout.shopify.com pages (1st party cookies only), it knows that these two cookies is the same person and the same visit. The query string looks like this: _ga=1.119272649.1393383918.xxxxxxxxx.
Because there is cross domain tracking, you need to make sure your Google Analytics is set up to ignore the fact that you are crossing domains. You do this through the referral exclusion list in the admin interface for Google Analytics.
This system also passes through a whole load of variables automatically, including when a user has viewed a Product List page, Product Description page, add to basket, checkout, etc, as well as some descriptions of those products. You can see those through the custom events and through the custom ecommerce tracking:
- Product ID is the SKU entered in the product page in shopify
- Product Name is the title of the product followed by the size as entered in the product page in shopify
- Product Category is the Product Type entered in the product page in shopify
- Product Brand is the Vendor entered in the product page in shopify
When you are setting up your products – bear this information in mind because it will impact how your products appear by default in your analytics.
Google Tag Manager (or other analytics)
If you want to put third party Marketing tags, or any other sort of analytics on the pages, then this is where you are going to get a bit stuck.
Shopify won’t let you put custom tags on most of the checkout process. As you can see from the diagram above, you can put custom tags on your bit of your site. To do this, you can go through the online store menu, then choose the themes. On this page it will allow you to choose to edit the HMTL/CSS – from here you should be able to find the theme.liquid. This is the template that all of your pages run through, so inserting your tags here will load the tags on all pages before checkout.
If you need to do tagging that involves cross domain tracking here, your luck is out. To do cross domain tracking you need analytics tags running on the landing page of the new domain, which you can’t do unless you use the Universal Analytics described above. This means that if you want to use Classic Analytics (for whatever reason) then you won’t be able to link transactions back to source.
If you use an analytics system that allows you to use third party cookies (eg Adobe) then cross domain tracking isn’t an issue.
You can also put tags on the thank you page, which is useful if you use a marketing agency who likes to have third party tags to be able to automate a load of their marketing efforts (and for post impression tracking and that sort of stuff).
To do this, there is a section in Shopify for third party marketing tags within the Settings => Checkout menu. This allows you to add your Google Tag Manager (or third party marketing tag, or analytics tags if you don’t want to use Universal Analytics).
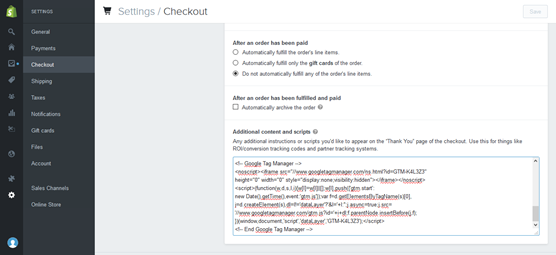
However, it isn’t that simple (it never is). The next step of using Google Tag manager is to put the details of the products you are using into the data Layer. Note that Shopify has its own data layer, so you could use theirs if you really wanted to, but here it is in the GTM data layer to make like a bit simpler.
You can use my script below, but I’ll explain what it does first. The script has to be run before Google Tag Manager, so make sure when you put it in the box for the snippets it is above the GTM code (or alternatively, make sure your ruleset for firing the tags within GTM uses the custom event included).
Firstly this code translates Shopify variables to Google Tag Manager standard ecommerce variables (so if for some reason you decided that you did want to use Classic Analytics, you can use these variables here). Within these variables there is the odd bit of fudging – for some reason the price and tax are listed in pence not pounds, so I’ve multiplied a couple of variables by 0.01 to get them in the right values.
Secondly I’ve added the products in. Some people might buy more than one product, so you have to loop the code so that it loads the variables for each product that the user has bought. It then loads the variables as we had them before in the normal universal Analytics:
<script>
window.dataLayer = window.dataLayer || [];
dataLayer.push({
‘event’ : ‘transactionComplete’,
‘transactionId’: ‘{{order.order_number}}’,
‘transactionTotal’: {{total_price | times: 0.01}},
‘transactionTax’: {{tax_price | times: 0.01}},
‘transactionShipping’: {{shipping_price | times: 0.01}},
‘transactionProducts’: [
{% for line_item in line_items %}
{
‘sku’: ‘{{line_item.sku}}’,
‘name’: ‘{{line_item.title}}’,
‘category’: ‘{{line_item.type}}’,
‘price’: {{line_item.line_price | times: 0.01}},
‘quantity’: {{line_item.quantity}}
},
{% endfor %}]
});
</script>
Having loaded the tags, then you can set up Google Tag Manager to have these variables, then you can include them in any third party marketing tag.
Shop as part of a site
If your shop is intended to be part of a wider site that already exists, then you potentially need to get your head around cross domain tracking.
There are three broad scenarios:
- Your site and your shopify site both use Universal Analytics and they both use the same domain name (different subdomains and different folders are fine). In this scenario, because you use the top level domain for your cookies (or at least you should do!) then users who move between your site and your shopify will be tracked seamlessly.
- Your site and your shopify site have different domain names, but both use Universal Analytics: In this case you need to make sure that any link from yourdomain.com to yourshopdomain.com has cross domain tracking enabled. Google has a lot of good documentation on this, but it is of course much easier through Google Tag Manager. You need to make sure the cross domain tracking is enabled on links in both directions (which is why it is useful to have GTM on the Shopify pages)
- Your site and your shopify site have different domain names and you use Classic Analytics on your main site: In this case you are out of luck. Classic Analytics uses different cookies to Universal Analytics, so you cannot track from one to the other. The recommendation is to upgrade to Universal Analytics (easier said than done in many cases). If you really want to continue using Classic Analytics, you are going to have to live with the fact you will not get your transactions associated with a marketing source. My recommendation if you can’t put Universal on your main site is to put Universal on the microsite and use as many landing pages on your shop as you can and then just admit that you are going to only get marketing sources from yourdomain.com in your Shopify stats, not where they came from beforehand
Of course, this is just how you set up the data collection, what you actually do with it is a different matter…
Thanks Alec, this is great!
I have universal analytics up and running on my site and have added google tag manager to each page.
I just wasn’t sure if I need to do the second part. Do I need to set up the data layer etc? I’m not clear as to the reason. I understand the different domain names e.g. my site vs. shopify’s checkout page. Any advice would be great thanks!
Thanks,
Gina
Hi Gina,
You don’t need to set up the datalayer if you are using the Shopify settings to insert your Google Analytics – it will automatically put all your variables into GA.
If you are using Google Tag Manager to put Google Analytics on your shop (I don’t recommend this – put your UA number into Shopify using their built in functionality if you can) you will need the datalayer to ensure you can do your ecommerce tracking (this then fires the ecommerce variables you need, like the revenue and the product details). You can set up GTM to do a transaction tag in this case, but be aware that you will lose all your source tracking (because the thank you page is on a new domain, you’ll get a new cookie for that domain and you’ll count as a new visit).
If you are just using Google Tag Manager to add some third party marketing tags and those tags require you to tell them a revenue number (and a transaction ID for deduplication), then you’ll need to add the datalayer. You can then create a variable within GTM that picks out the revenue from the datalayer (and the transaction ID), which you can insert into your third party marketing tag.
Hope that helps!
Obviously the nuances are that if your shop isn’t ‘standard’ then you might struggle to use the default settings. Feel free to reach out to me at alec@whencanistop.com if you don’t think the standard version works for you and you need something bespoke.
Cheers,
Alec
This was a really awesome article really put the information in an easy to understand format.
I have personally been trying to figure out how to place Google Tag manager into the 3rd party tracking in shopify’s checkout menu. The problem that I am running into however is that tag assistant tells me that GTM cannot be placed into a tag and so the tracking will not work 🙁
Thanks for this Alec. I referenced you in my shopify writeup that I’m publishing/updating on Github. (https://github.com/toddheslin/gtm-ecommerce-platforms/blob/master/shopify/shopify.md)
It turns out that I worked out a few ways to get the analytics insight either through using GA and the universal tracking (which I learnt from you) or using GTM by embedding the script in the GA ‘extra scripts’. Check out my notes at the bottom of that page.
So all in all paste the GTM code:
1) Online Store > Themes > … > Edit HTML/CSS > theme.liquid > place immediately after the opening tag
2) Settings > Checkout > Additional Content and Scripts > Paste above other scripts (i.e Facebook Pixel and AdWords Conversions Tracking)
Hi, It’s a very interesting article, thanks.
Anyone knows why when I receive visits from utm_campaign and visitors buy, I have zero in revenues from that visits?
Any suggestions would be really appreciated.
Thanks
thanks,
I’m still in doubt how I add tracking to the steps between /cart and the thank you page?
probably I have to go into some liquid file?
The user goes to checkout.shopify.com after /cart
also is the shopify datalayer variable available as javascript?