GTM Custom Templates: Push to the dataLayer
This is the third part of an occasional series on Google Tag Manager Custom Templates. This one isn’t related to the first two (which were related to each other). In this one I will push something to the dataLayer if the dataLayer object doesn’t currently exist.
You might be wondering why I am doing this when you could easily use a custom html tag to push something into the dataLayer. I discovered with one of my clients that the content security policy of the site was stopping me from running any custom html, so we were limited to just using custom templates and hitCallbacks.
As mentioned in part two of this series (GTM Custom Templates: Set Cookie ID) hitCallback allows us to trigger a function after the tag has been loaded. In this case what we want to do at the point of triggering the tag is to push a value into the dataLayer that can be used later on. This has limited value on a normal website (the user navigates to a new page and the dataLayer is started again from scratch) but can be very important in a single page app.
So in this case we’re doing something that helps fix a Google Analytics issue. When a user arrives at a single page app page, they do so with a referrer and potentially a campaign code. When the user moves on to the next part of the single page app the url can be overwritten, but the referrer will not be. That can lead to some strange scenarios where campaigns are overwritten because Google Analytics thinks that the new page has a referrer that isn’t internal and overwrites the campaign code with a new session.
So there are a couple of ways of solving this problem – one is to rewrite the value of the referrer in the tag to something internal (that can be dangerous) or the other is to tell the tag that the url of the page hasn’t changed (even if it has). This is where this custom template comes in – we are going to write the value of the url into the dataLayer and then use this value as the url value.
Fields
So we only really need one field here (I could have created a second that allowed you to choose the dataLayer variable so that it could be used elsewhere, but I didn’t). The field that we need to set is the field that is the input one – what do you want to use to put into the dataLayer.

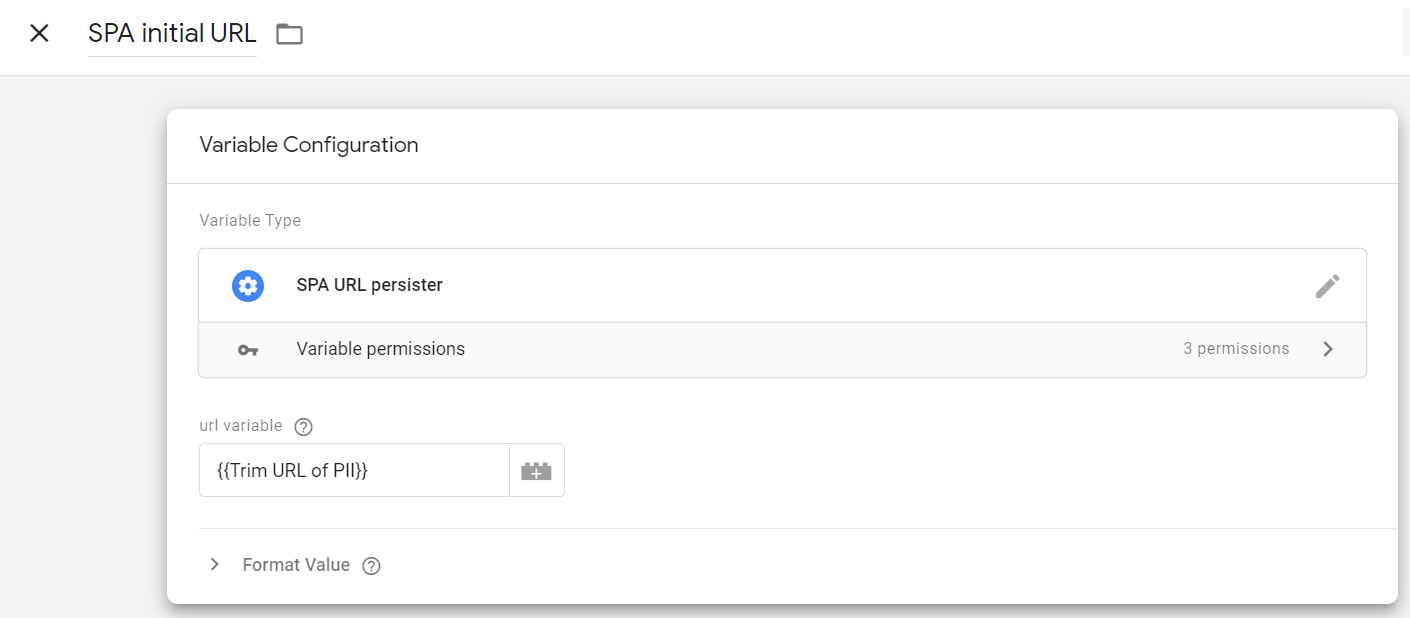
As before – what does this look like in the interface when you try and create a variable? It looks like the below. The variable that you put in the box here (in my case one called ‘Trim URL of PII’) is the one that is pushed into the dataLayer.
Code
So here is the code that we then use to push the values to the dataLayer. As mentioned earlier I could have added a bit in the middle that looked up a value from the fields to determine what value of the dataLayer we are picking up, but I didn’t, I’ve hard coded it as the value ‘initialurl’. The last bit of the code says to only set a value if it is currently ‘null’ (that way we aren’t overwriting a value, we’re only setting it once at the start).
const log = require('logToConsole');
log('data =', data);
const createQueue = require('createQueue');
const copyFromDataLayer = require('copyFromDataLayer');
const initialurl = copyFromDataLayer('initialurl');
const currenturl = data.url;
const dataLayerPush = createQueue('dataLayer');
if (initialurl == null){
return () => {dataLayerPush({'initialurl': currenturl});
};
}Permissions:
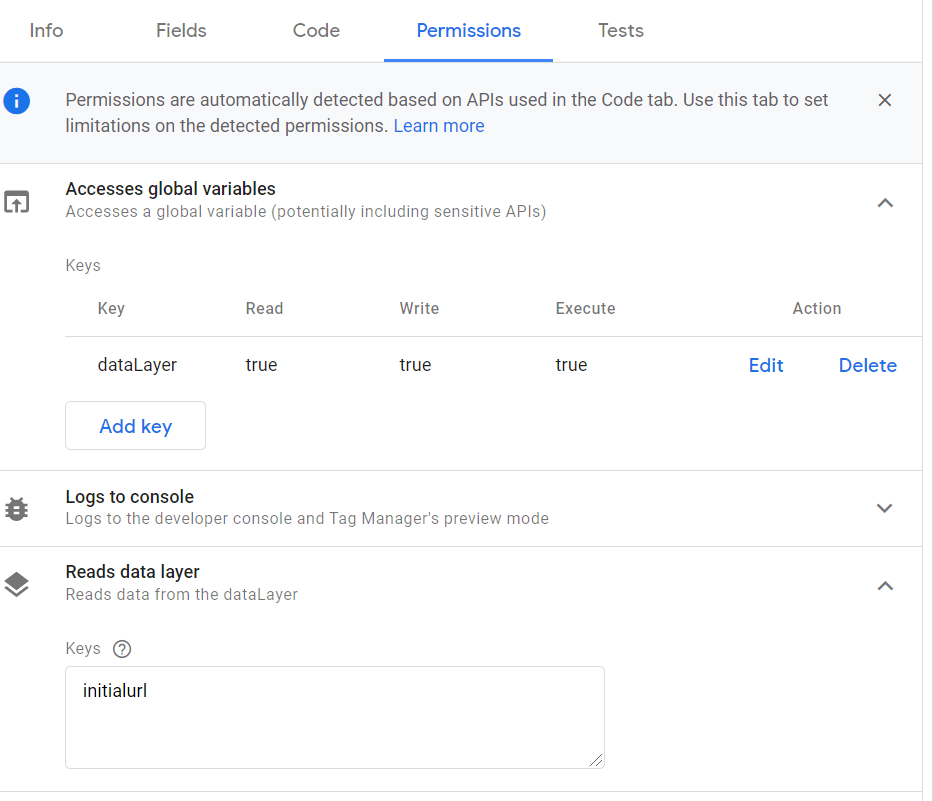
Permissions are the final part of the process. Here we need to make sure that we can read the dataLayer and also read the global variables that are being set on the site from the dataLayer. As with the other templates, if you are using a different dataLayer value you will need to specify it in this list otherwise it won’t work.
Applications
So how do we use this custom template. Well there are two things to do here. Firstly the custom template needs to be made into a variable as shown above using the variable that you want as the input url (I’ve got one that has trimmed off PII first, but you may not want to).
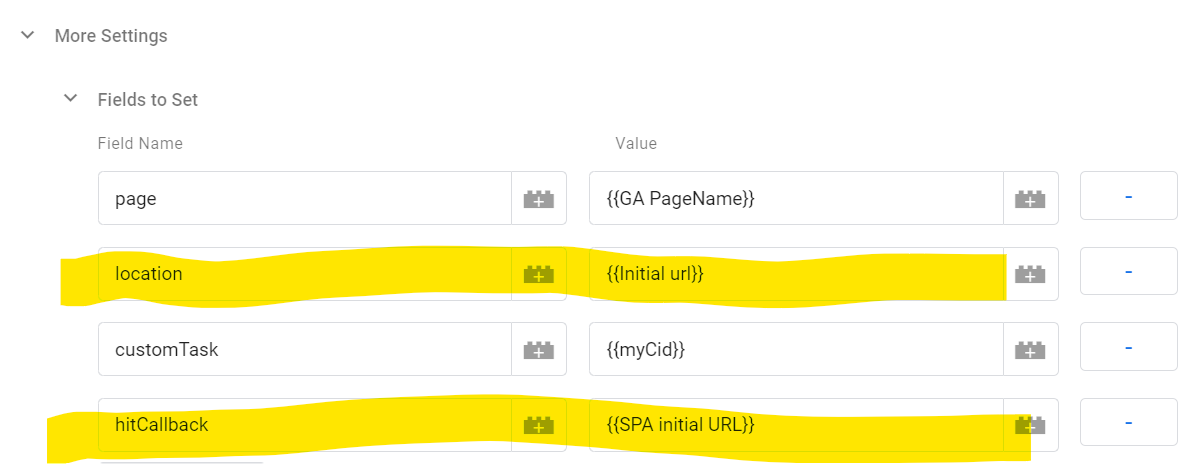
Secondly there needs to be a new variable that picks up the value of the dataLayer that you are setting. However remember that this could be blank at the start of the visit because it won’t have been set yet, so you need to give it a default value which is the same as the one that you were using as the input value of the custom template.

Thirdly you need to use both of these in the tag. Firstly you need to tell the tag that the url is this new variable that you’ve just created (not the default one of the page as it currently is). Then secondly you need to run a hitCallback that triggers the function that updates the dataLayer if it doesn’t already exist:
Now when a user lands on an single page app with a campaign code and moves within the single page app, Google Analytics will think that the url hasn’t changed and will keep the campaign code and will not overwrite it.