Implementing GA4 custom events
I’m about to do a bit of a quick fix for a client on their GA4 implementation before we get the full one – their old implementation of GA4 tracked some specific events that they were using as conversion points and we’re going to replicate that until we can get the full implementation done where we’ll add to the existing tags with new events, new custom parameters and probably different events. But here it felt like a useful way of demonstrating how to implement custom events in GA4 through GTM following on from the last post of how to do the basic implementation of GA4.
As mentioned in the first post of my series, GA4 is event driven in a completely different way than other analytics tools and this allows you to create events that can be used as conversions in reports. There are two ways of doing this – the first way of doing it is via GTM with a new custom event which I’ll show here and the second is the way that you would traditionally create conversions in the old Google Analytics.
Personally, I think it is more efficient creating the events in GTM if you are using GTM so that you don’t have to manage two different sets of set up processes. However there are some instances where it might be easier to do it in GA4 (especially if you don’t have access to GTM or if you don’t want to create lots of subsets of the same rule in GTM but do want to break out some of a particular event into a newly named one).
Creating events in GTM
With this method you can create events without having to do anything in GA4 at all – just set them up in GTM and away you go (there are some other steps you can take of course).
Event tags can be set up without any pre-existing configuration tag, but the best option would be to make sure the configuration tag has already been implemented on the page and then that can be used as the basis for the event tag.
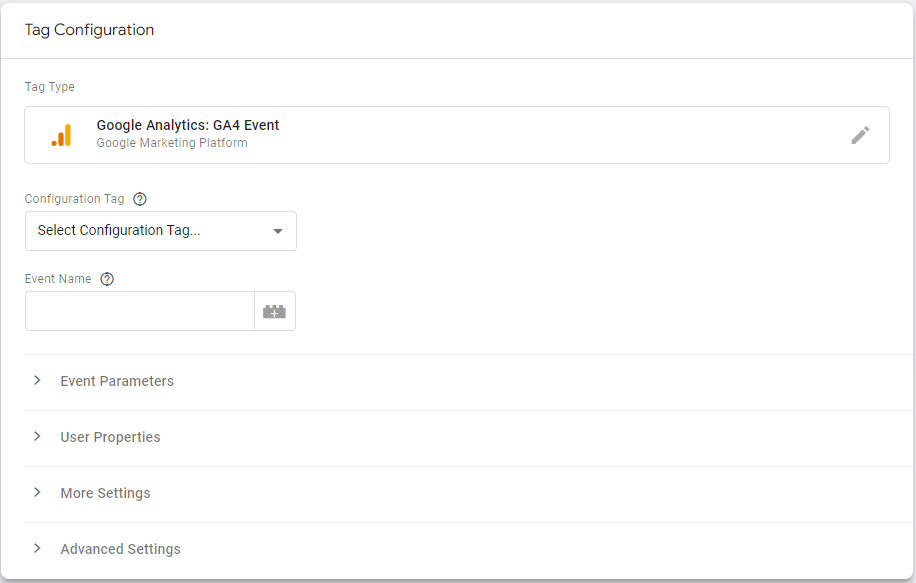
For my tag here I am going to choose the configuration tag that I set up when writing the previous post and then my event here is going to be clicking on a button.
The next thing to do know is that your event should have an easily decipherable and unambiguous name – remember this is going to be appearing in your reports and you don’t want someone looking at ‘click_on_big_button’ event and wondering which big button it is a click on or if it is all big buttons.
You can also assign parameters to an event (including the page_view event), which I’m sure I’ll come on to in a later post.
Remember to test this using the preview mode and then you can publish.
That essentially is it – the data will now start appearing in your GA4 reports.
Creating events in GA4
The alternative method to doing this is to create a new event in GA4 based on an existing event – this is similar to what you used to do when creating goals in the old GA.
In the settings of GA4 you can go to the page that has all the settings for your events and then you can choose to create a new event.
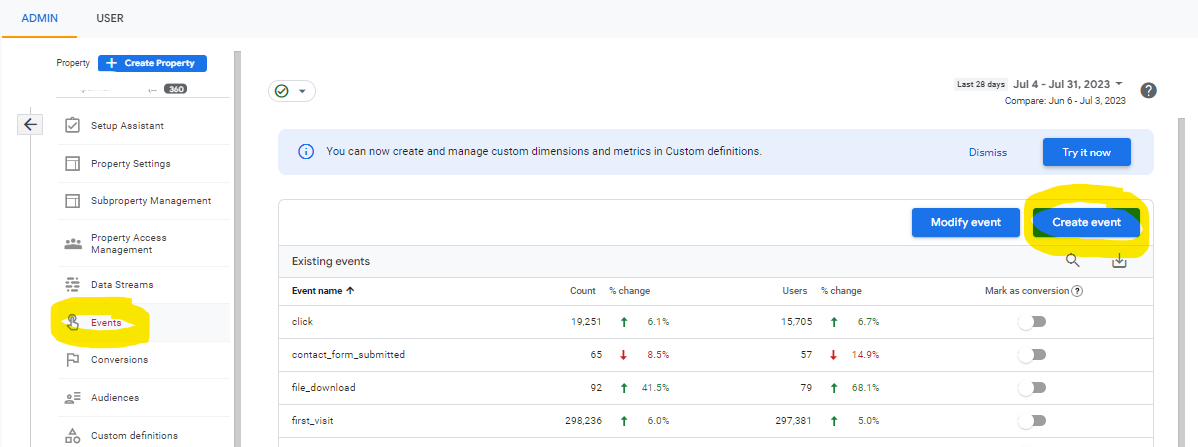
Now this method does rely on you already having an event running at the time, so you may be questioning why you are creating this event here if there is already one running – but the reasoning is that you may want to turn what is a mundane page view into a specific event and you don’t want to have to go through the rigmarole of creating an exception in your GTM for that specific event.
You may also want to create a custom event that crosses over several different values or makes use of parameters, where if you created the rule in GTM it would be overly complicated.
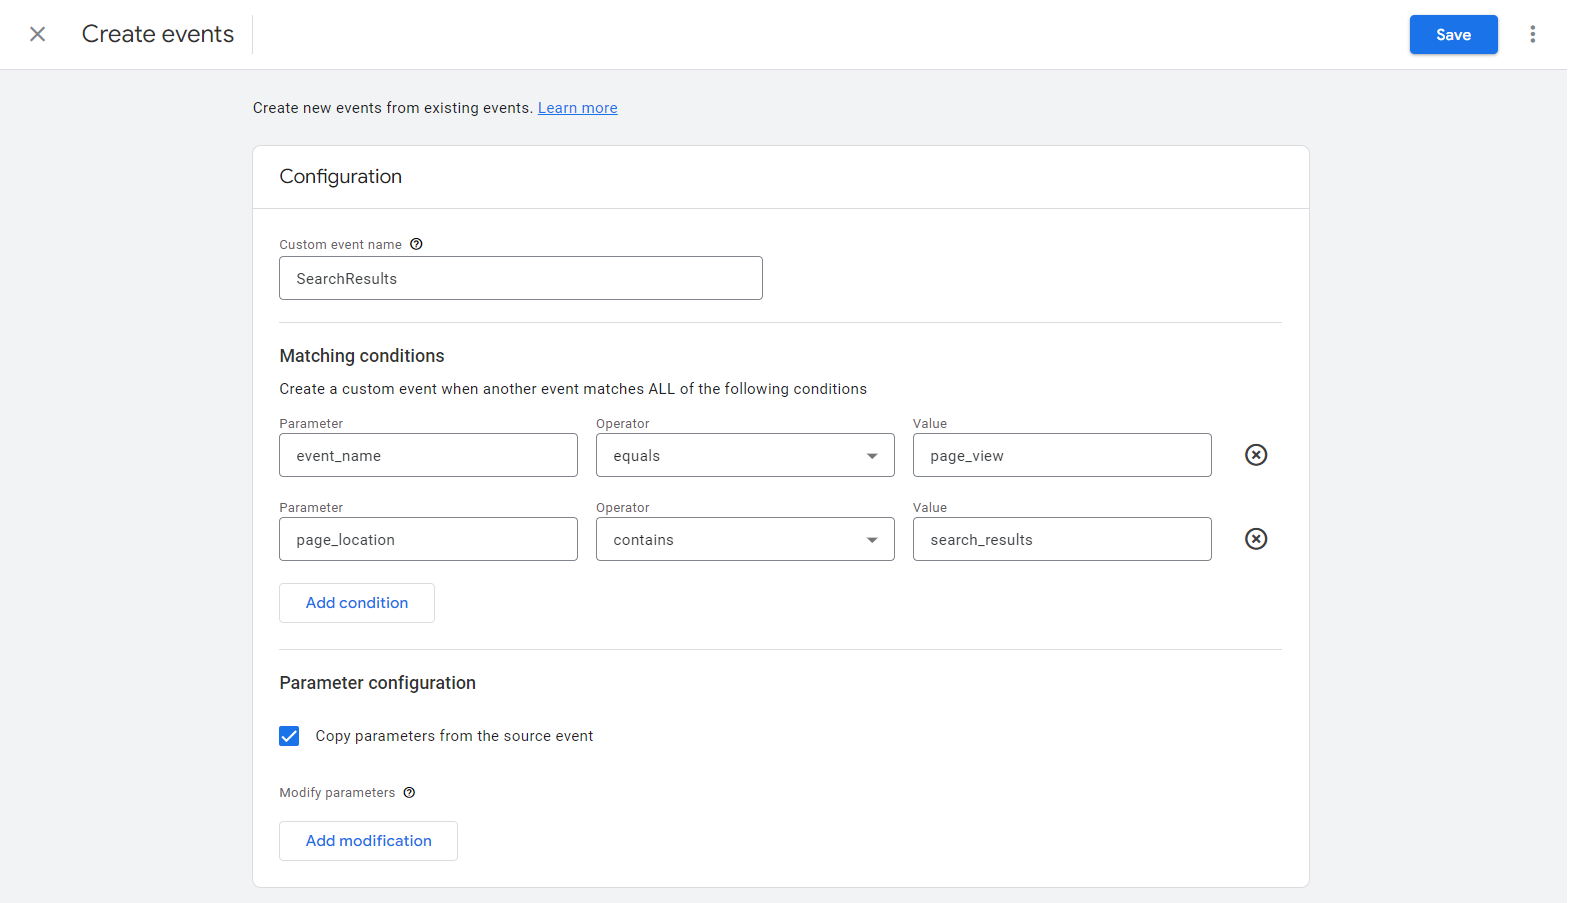
Here for example I have created a custom event that is based on a user hitting a search results page and generating a page_view. This tag could actually be one of several in GTM so rather than creating a bespoke rule in GTM I have decided to use a rule in GA4.
I think normally I’d recommend trying to stick to creating all your rules in one place, rather than doing lots of them like this, but I’ve done it this way here because I didn’t want to add extra complexity into GTM for something that was bespoke and created after an initial implementation.
Note here you can also add modifications to your events by adding new parameters and/or editing existing ones. This is actually no too dissimilar to what you can do with processing rules in Adobe Analytics as well.
In this case I’d also strongly recommend ticking the box to copy parameters from your original event so that if someone wants to see them in a report then they can.
Turn a Custom Event into a Conversion
In this setting you can also turn your events into conversions – although the distinction between the two can sometimes be a bit blurry.
In the events section you can see that there are sliders so that you can turn your event into a conversion or if you haven’t yet registered the event you can also use Conversions menu page and just add in the event name:
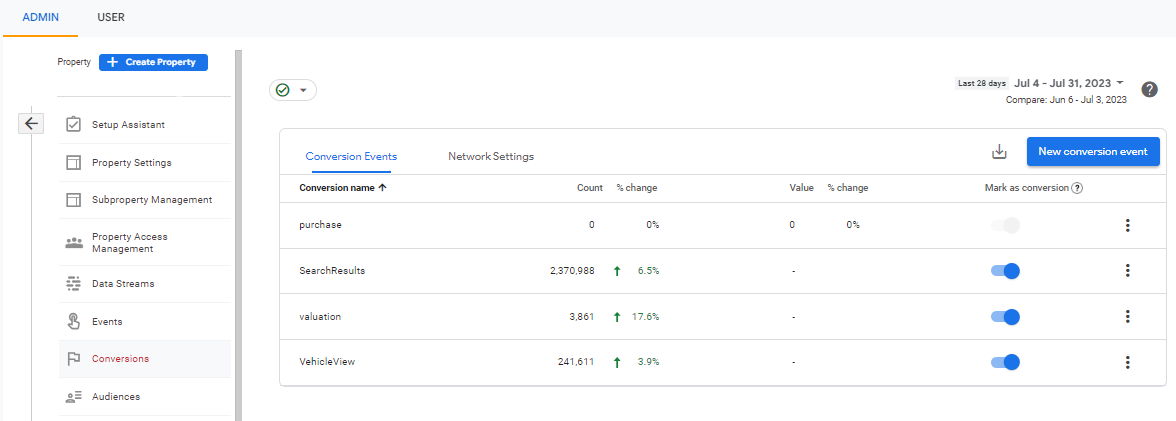
Conversions and events don’t actually have that much difference between them. In a traffic acquisition report, for example, your report in the interface will allow you to say how many of a specific event have occurred or how many of a specific conversion. A lot of the time those will be the same thing.
What you can do in the settings of your conversions though is change (using the three dots next to a conversion name) the way that the conversion is counted – either as every time the event occurs or just the first time it occurs in a session.
You can of course also give a conversion a set value in this section as well, although if you are going to give a conversion a value you are probably better doing it either offline where you can manipulate the value more easily or dynamically based on parameters on the page.